The cockpit step is from the same piece, from a few years ago. It's a very useful enhancement & it now looks a bit nicer.
And the companionway steps are looking good in situ. I might need to do some work on the galley, now ...


The companionway steps have been pretty manky for a long time. I took them home to get them sanded and re-varnished - Angus did the work, and substantially exceeded expectations.
The piece of mahogany on top of the table saw bench is a new lid for the stern cockpit locker. The piece on the floor to the right is the 'shelf' I put at the front of the cockpit (like a bridge deck) to create a space for putting things down and under. I think there is a photo of it somewhere in this blog...
Both pieces of mahogany came from the counter in my grandfather's photography shop (now long gone), so definitely recycled. I may get one or two other useful sections out of it, although it has some damage and quite a bit of surface 'patina'. If it was perfect it would just look wrong on Raasay, in any case.

The drop in the electrolyte level did look like the consequence of a boiling event, though.
Anyhow, I now have AGMs. So I don't have to worry about heel angles anymore. Or about topping up.
A small issue:
The Leoch AGMs are rated as '115 ah', and the Trojan batteries I removed are rated at '225 ah'. However, both are rated at 115 ah (or thereabouts) for a ten-hour discharge period. The higher rate for the Trojans is for a twenty-hour discharge. The arithmetic here doesn't quite make sense, because 10 amps over 10 hours is 100 ah, and over 20 hours is 200 ah... I'll need to go back through the specs to understand this.
I should still be able to discharge 10 amps for 10 hours and keep the bank (two batteries) about 50% charge. This looks fine for overnight sailing, for instance.
I have a Sterling Alternator to Battery charger capable of putting 90 amps (alternator maximum) into the batteries during the boost phase of the charge.
I also have a 200w solar panel to deal with lower demands.
.jpg)
Hanging in the Slings, ready to get at the keel shoe.
.jpg)
CopperCoat on, keeping it warm.
With the (slightly wavery) boot top applied, and the topsides cleaned up, we're nearly ready to go:

There is one job left, that can only be done when the boat is lifted. The bottom of the keel needs cleaned up and CopperCoated. Lossiemouth Marina will put me in the boat lift the day before I launch, so I can do it then. I'll drape the bottom of the keel in Visqueen (a mini-tent ...) and heat the area up so that the CC cures quickly. I routinely dry the boat out (one reason for going for CopperCoat - it can be maintained alongside), so I expect the bottom of the keel to get a good bit of wear. And it's rarely seen.
I guess I'm saying it may end up a bit rough.
But I don't know how else I could do it ...
I thought I had the prop shaft installation finished until I made this unpleasant discovery:

The new prop shaft isn't shorter - I'd just inserted it further into the clamp than the old one had been. Undoing the clamp again was a grim prospect, but I'm getting quite good at it now & have all the right equipment.
Here's the rudder having CopperCoat applied:


This was very difficult to remove and replace. It goes from the stern tube to the stuffing box, and it's underneath the fuel tank, partly behind a small bulkhead.
The hose clamps on the aft end (that secure it to the stern tube) are particularly difficult to get at (very long extensions on the 1/4" drive ...)
Here is the new one :

And here it is in place, with the new prop shaft:

I cleaned up the stuffing box, replaced the grease injection joint with a stainless steel connector, and renewed the stuffing.
This is the area I am most worried about when the boat goes back in. It's even harder to access now than it looks in this picture because the exhaust system is back in place.
Here's what it looked like before:

And yes, the dimensions are slightly different. The new hose is an inch longer. I wanted to see it better...
Finally - some useful tools:

Here's the Visqueen tent we set up to create a warmer (12-14 degrees) environment.

Applying the CopperCoat was a fraught business. We started about mid-day and finished about midnight. And then had to stay up a lot of the night to monitor the diesel heater as the outside temperature was expected to drop below 8 degrees ...
We just kept adding coats until we'd used up 7 of the 8 'doses'. One was kept back to do the shoe of the keel and the rudder. We also saved a bit by stopping at the waterline rather than using it as a boot top as well. We definitely got four coats on everywhere and possibly five - certainly over large areas of the hull.
The first coat was epoxy only (no copper powder), and it was a bit thick in a few small patches. We ended up with drips ...
After that, we thinned the mix and rolled it on carefully - spreading it out as much as we could.

After my struggles with the Allen bolts in the prop shaft clamp a year or two ago, I wasn't looking forward to this. At the time I gave them a good soak in WD40, and this seems to have penetrated - I got them out fairly easily this time.
I didn't realise that there were also two grub screws in one side of the clamp until a friend specualated that there might be ... they were pretty well disguised with rust and dirt.
I opened the clamp using a couple of chisels which I cut down and modified for the job:


This was, slightly unexpectedly, a stinker of a job.


I thought the shoe on the bottom of the skeg would present difficulties, but the silicon bolts actually came out readily, and the shoe was easy to remove.


Once I had got it to move slightly I could get a puller under it. With a lot of heat, this finally got it out. I now have a bit of an engineering challenge repairing the thread and replacing the nut:

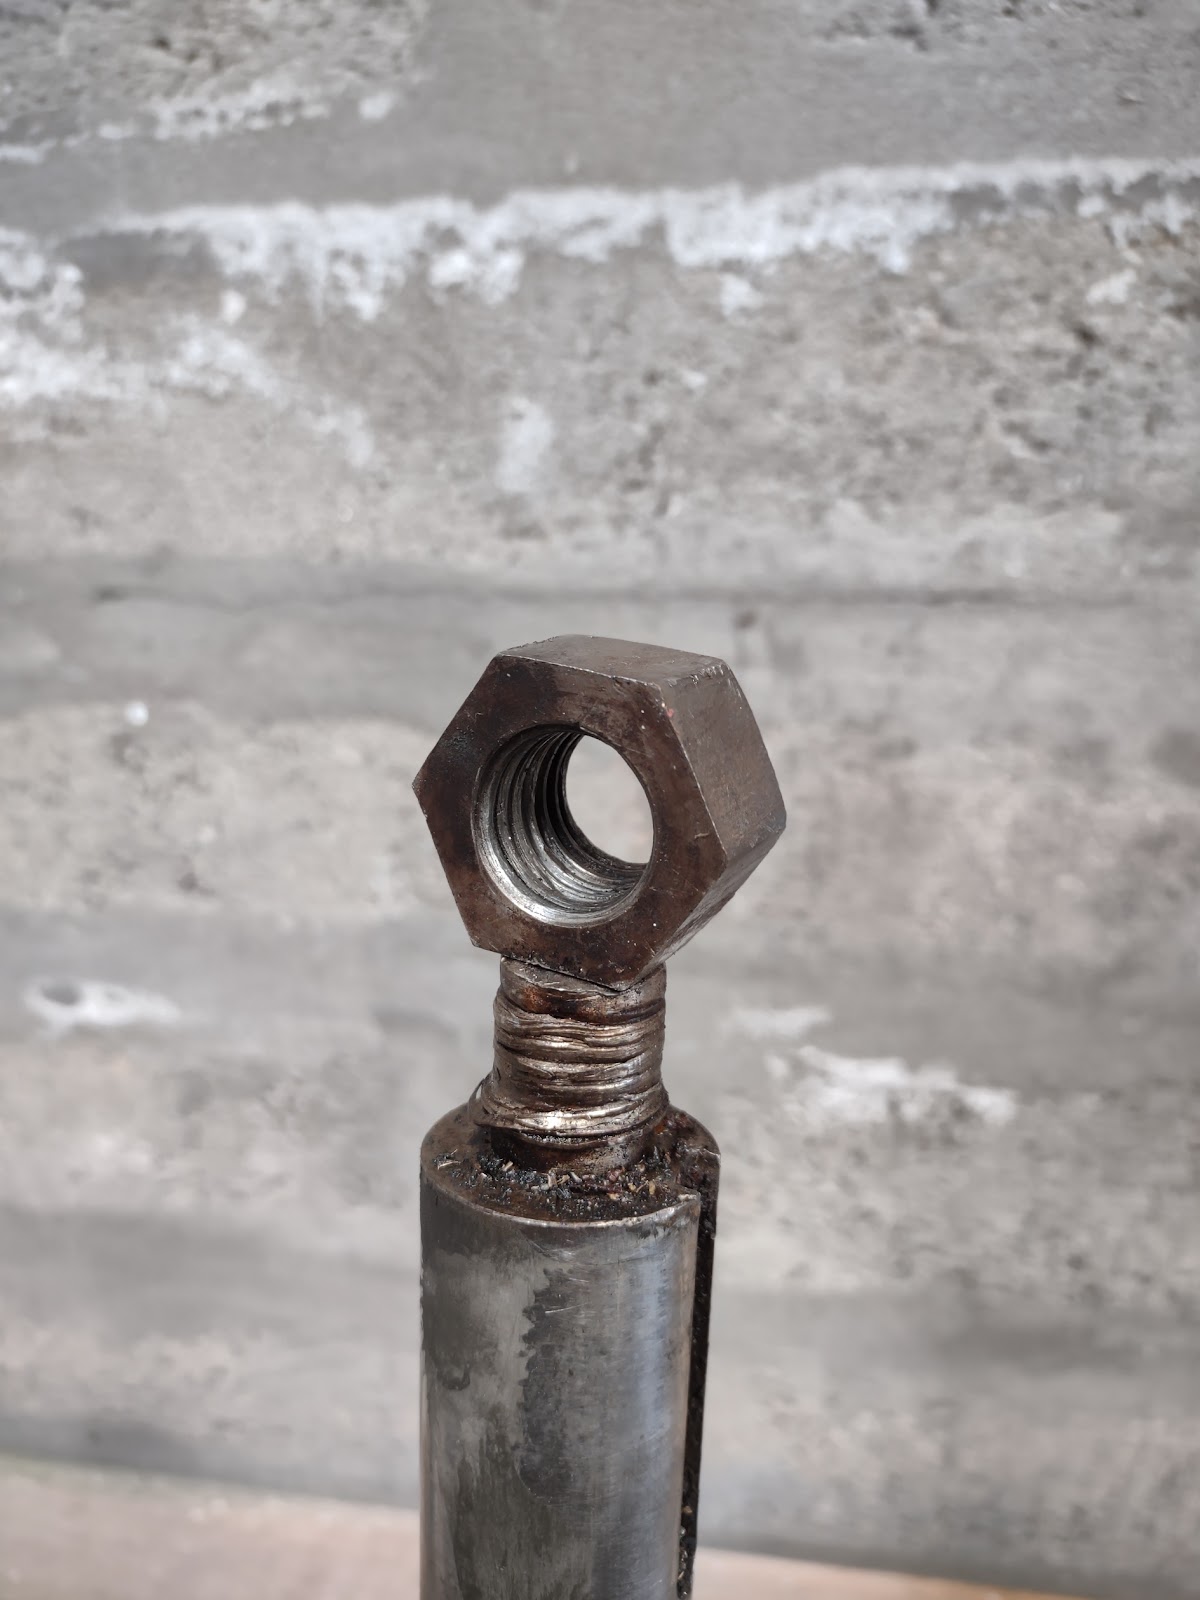
A man is coming to look at it on Friday ...
I can think of a few solutions. None of them will be cheap.
I also have the problem of getting the bronze rudder head fitting back onto the shaft. I will get advice on this. It might be worth getting it very slightly reamed. The rudder actually hangs by this fitting - the bottom of the stock is located in the skeg shoe, but it doesn't rest on it.
And, as it happens, all the bearings look fine ...
The rudder needed to come out for another reason, which was to allow clear access to the skeg for copper-coating:

Knowing what I know now, I might have passed on this ...
Some new/refurbished items. The old locker lid was on the point of failure, and I had this nice piece of mahogany ... The cockpit step is fr...


.jpg)

